Selection with Filters
SDBox Design Software - Guide for selecting objects by type, layer, color, linetype, and textstyle in CAD drawings
Overview
Selection of objects based on type, Layer, color, Linetype, or Textstyle and combination of all these or selection of their opposites.
This feature allows you to filter and select objects in your drawing based on specific properties, making it easier to work with complex drawings.
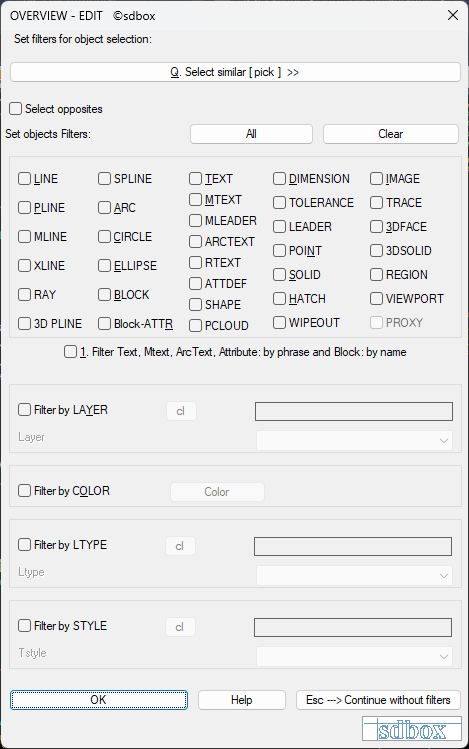
Selection filters dialog interface
^ Back to topSame as Selection [pick]
Select an object on screen and then all similar ones regarding Layer, Color, Ltype, Textstyle, size, scale, etc.
This option allows you to quickly select all objects that share the same properties as a selected reference object.
^ Back to topSelect Opposites
The opposites of whatever selections you make in the dialog are selected.
This is useful when you want to select everything except objects with certain properties.
^ Back to topAll
All checkboxes are selected.
The use of this option serves cases where you need most of the dialog options and only need to disable a few.
^ Back to topClear
All selections (checkboxes) are deactivated.
Use this to start with a clean slate when defining new selection criteria.
^ Back to topObject Types
Select one or more object types.
You can choose from various object types including LINE, SPLINE, TEXT, and others to filter your selection.
^ Back to topText, Mtext, Arctext, Attribute Selection with Phrase Search or Block by Name
Text, Mtext, Arctext: After selecting these objects, you can distinguish only those containing specific phrases.
Attribute: After selecting Blocks that have Attributes, you can distinguish only those containing specific phrases.
Block: After selecting Blocks, you can distinguish some based on their names.
^ Back to topSelection by Layer
Select one or more Layers to participate in the selection.
You can also use Wildcards e.g. Iso***, Wall#@, etc.
When selecting more than one Layer, they are separated by comma ",".
^ Back to topSelection by Color
Select a color that the objects to be selected will have.
This filter selects objects based on their color property.
^ Back to topSelection by Linetype
Select one or more Linetypes to participate in the selection.
You can also use Wildcards e.g. Ax*** etc.
When selecting more than one Linetype, they are separated by comma ",".
^ Back to topSelection by Textstyle
Select one or more Textstyles to participate in the selection.
You can also use Wildcards e.g. GR*** etc.
When selecting more than one Textstyle, they are separated by comma ",".
^ Back to topText Phrase Search
If you have set the "Text with phrase search" option, the above tab opens.
You can write what the phrases of the Texts to be selected will contain. Different phrases are separated by comma ",".
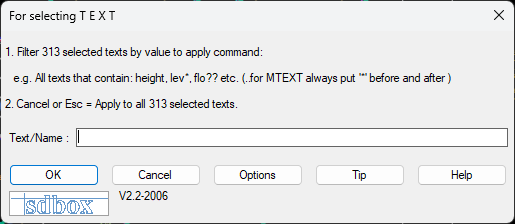
Text phrase search dialog
Help
All phrases contained in the selected Texts are displayed. Each time you open this tab, the phrase you select is added to the selection.
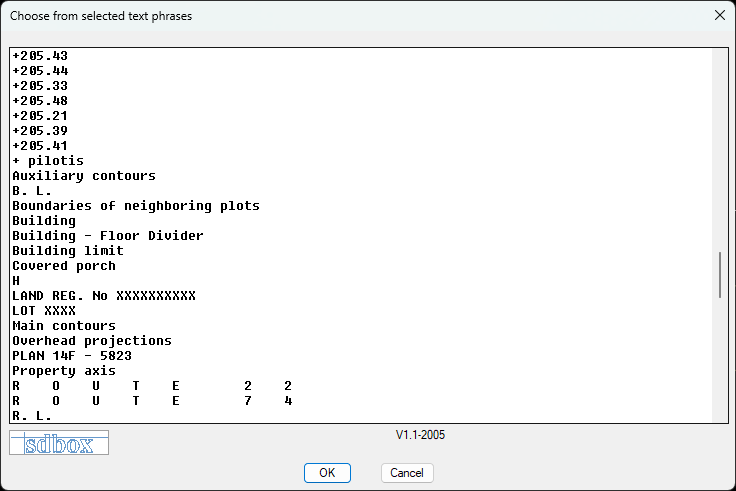
Text phrase selection help
Info
Opens the tab below where examples of Wildcards usage that you can use in the phrases you are searching for are listed.
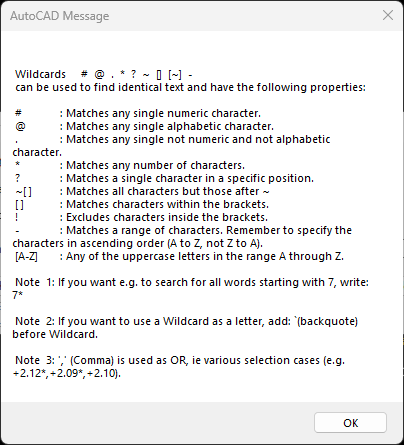
Wildcards usage information
^ Back to topBlock Name Search
If you have set the "Block with name search" option, the above tab opens.
You can write what the names of the Blocks to be selected will contain. Different names are separated by comma ",".
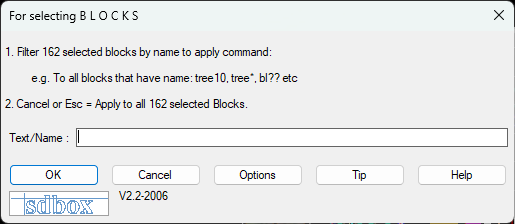
Block name search dialog
Help
All names of the selected Blocks are displayed. Each time you open this tab, the name you select is added to the selection.
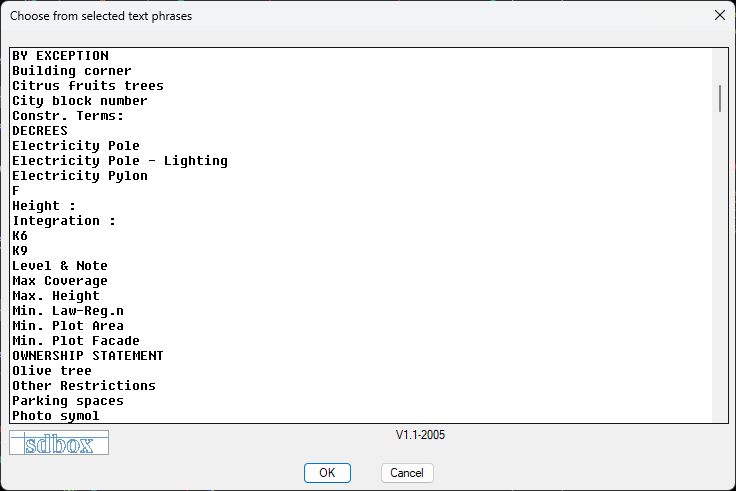
Block name selection help
Info
As above (Wildcards information).
^ Back to topAttribute Phrase Search
If you have set the "Attributes with phrase search" option, the above tab opens.
You can write what the phrases of the Attributes to be selected will contain. Different phrases are separated by comma ",".
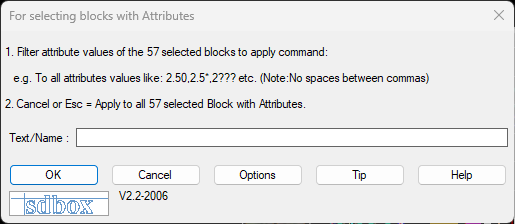
Attribute phrase search dialog
Help
This field is inactive for Attributes.
Info
As above (Wildcards information).
^ Back to topObject Selection Options
Select area of same objects: <All, Fence, WP, CP, Group, Add, Remove, Previous, Auto, Single>
Select objects:
The object types and other settings you have selected are displayed for your information.
You can select the area containing the objects or "all". From what you select, only those that have the above properties will be distinguished.
As in most SDBOX and AutoCAD commands where you select objects with "Select objects", you have the following options:
- All: All drawing objects are selected and those that present the selected properties are automatically searched.
- F: Fence: You define lines and only objects intersected by them are selected.
- WP: Window Polygon: You define a polygon and objects located inside it are selected.
- CP: Cross Polygon: You define a polygon and objects within it and those intersected by the polygon sides are selected.
- G: Group: You select a Group which you have defined with the AutoCAD Group command.
- A: Add: You add points to your selection. This option is default and should only be used after selecting Remove.
- R: Remove: You remove points from your selection.
- P: Previous: Points you selected during the last command that had "Select objects" are selected.
- U: Auto: This option differentiates the selection method with 2 points (BOX) as follows: When selecting with "rectangle" from left to right, only objects completely within the rectangle are selected, while from right to left, intersected objects are also selected.
- S: Single: The selection capability ends after you select the first object.
Notes:
The tab that opens for "selection by filters" can be rejected with Esc and you can continue the respective command.
If you select some filters and continue the command that has the tab, then if you type "All" for object selection, only those objects that present the tab's properties will be selected.
Command Usage:
The main reason for using "selection by filters" is to select specific objects that are among others in the Drawing without selecting them one by one.
Tips:
If you have a set of Layers that you need to isolate frequently, then if you select them from the "Layer" field of the tab, you can quickly redefine them in each new use of the command by simply typing "Y" and Enter when the tab opens.
The above setting is saved for all commands that use the tab.