Numbers and Calculations
SDBox Design Software - Command guide for operations with numbers in texts, blocks, line lengths, areas, and distances in CAD drawings
Operations on Text Numbers ZNM
Operations on texts (Text) that are numbers. You specify the operation, the number, and the decimal places to be displayed. You can select specific text types where the operation will be performed.
Performs mathematical operations (addition, subtraction, multiplication, division) on text objects that contain numbers. You can filter the texts by layer, style, etc.
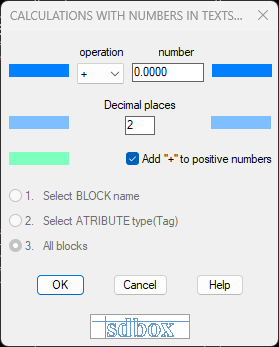
ZNM command interface
Operation Parameters
- Operation: Selection of Operation (addition, subtraction, multiplication and division).
- Number: Entry of the number with which the operation will be performed on all texts.
- Decimals: Selection of the number of decimal digits to be displayed on screen in each text after the operation.
- Display "+" for positive: If you select this option then in each text that is a positive number, on screen it will be displayed with "+" at the beginning.
Object Selection
You can select objects using filters (Layer, Text Style, etc.).
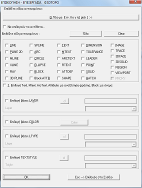
Object selection with filters
The selection dialog for "selection based on filters" can be dismissed with Esc.
If you have a set of Layers that contain the number texts, then if you select them from the "Layer" field of the dialog, you can quickly redefine them in each new use of the command by typing "Y" and Enter when the dialog opens.
Select texts to modify:
Enter operation (+ - * /):
Enter number:
Enter decimal places:
Add '+' to positive numbers? [Yes/No] <No>:
Notes:
When the command finishes, you are informed on how many of the selected texts the operation was performed. For those where it wasn't performed, they don't contain only numbers but also other types of text.
Command Usage:
The most common use of the command is when in some drawing or study the elevation origin changes and you need to add or subtract some number from all.
Besides Operations you can also use the ZNM command to change the decimals of texts that are numbers. This is done as follows: Select operation "+", number "0.000" and the number of decimals you want. So to each text 0.00 is added (i.e., its number doesn't change) and the decimals you have selected are set.
Tips:
You can also use this command to batch update the decimal precision of all numeric texts in a drawing without changing their values.
Operations on Block Numbers ZNMB
Operations on Block Attributes which are numbers. You specify the operation, the number, and the decimal places to be displayed. You can select specific Attribute types or Blocks where the operation will be performed.
Performs mathematical operations on Attribute values within blocks. You can filter by block name or attribute tag.
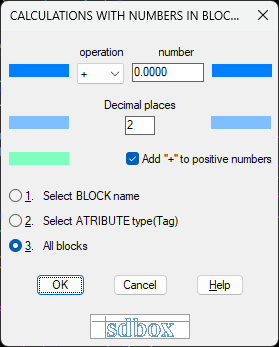
ZNMB command interface
Operation Parameters
- Operation: Selection of Operation (addition, subtraction, multiplication and division).
- Number: Entry of the number with which the operation will be performed.
- Decimals: Selection of the number of decimal digits to be displayed on screen in each Attribute after the operation.
- Display "+" for positive: If you select this option then in each Attribute that is a positive number, on screen it will be displayed with "+" at the beginning.
Selection Options

Block type selection
After clicking OK you will be asked to select a Block from those on which the command will be executed to record its name. In the next selections of the command you will be able to select only Blocks that have this name. The operation will be executed on all Attributes of the selected Blocks.

Attribute type selection
After clicking OK you will be asked to select an Attribute of a Block from those on which the command will be executed to record its name. In the next selections of the command you will be able to select only Blocks (of any name) that have this Attribute. The operation will be executed only on the selected Attribute of whichever Blocks are selected.

Object selection prompt
After clicking OK the command continues waiting for you to select the Blocks in whose Attributes the operation will be performed.
Notes:
Useful for batch updating attribute values like room numbers, elevations, or quantities across multiple blocks.
Operations with Distances D+D
Continuous operations with distances or numbers that you can type. Addition, Subtraction, Multiplication, Division, sign inversion, square root, percentage %, 1/x, exponent, and average of distances that you select on screen or numbers you type.
Interactive calculator that works with distances picked from the drawing or numbers typed at the command line.
Enter distance or number <Enter = result>:
How it works
The command waits for you to give the 1st distance or the 1st number that will participate in the operations.
- Distance: Given by 2 points on the drawing screen that define the desired distance.
- Number: You type some number.
After giving distance or number you must give the type of operation that will be done with the next number or distance. The command writes the last number or distance and waits for you to give the operation.
After entering the second value, the calculation is performed and the result is displayed:
Enter operation 11.2250 [+ - * /] <+>:
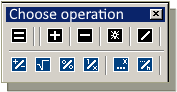
Operations palette (click to open)
Command Usage:
Useful for quick calculations while drawing, like adding lengths, calculating percentages, or converting units.
Operations with Objects L+L, P+P, A+A, T+T, S+S, LPATS, O+O, E+E
Operations with length (or E+E for areas) of objects in the Drawing, numbers from texts or dimensions, and distances on screen or numbers you type. Addition, Subtraction, Multiplication, Division, sign inversion, square root, percentage %, 1/x, exponent, and average.
Comprehensive calculator that can use lengths of drawing objects, text values, dimension values, or typed numbers.
Available Commands
- L+L: Selection of only objects of type Line.
- P+P: Selection of only objects of type Polyline.
- A+A: Selection of only objects of type Arc.
- T+T: Selection of only objects of type Text.
- S+S: Selection of only objects of type Spline.
- O+O: Selection of only objects of type Dimension (that have real value).
- LPATS: Selection of all of the above.
- E+E: Selection for their area of only objects of type Pline, Spline, Arc, Circle, Ellipse.
Enter operation [+ - * /] <+>:
Operations palette (click to open)
Data Type Selection
After entering the operation, you're asked how you will select the numbers that will participate in the operation.

Data type selection
- X: Cancel at this point and reselect Operation.
- Distance: Selection of distance on screen with 2 points.
- Number: You select on screen Text or Block that contain a number or type a number.
- Select: Selection of objects whose length (or area for E+E) or content will participate in the operation.
Object Selection
When selecting objects:
Object selection with filters
The selection dialog for "selection based on filters" can be dismissed with Esc and you can continue the command.
If you have a set of Layers that contain the objects you often use in the command, then if you select them from the "Layer" field of the dialog, you can quickly redefine them in each new use of the command by simply typing "Y" and Enter when the dialog opens.
Examples
Example T+T (Text addition):
8 Texts........... -> Addition Result: 26.5300
Enter operation 26.5300 [+ - * /] <+>:
Example A+A (Arc length addition):
2 Arcs........... -> Operation Result: 3.2000
Enter operation 3.2000 [+ - * /] <+>:
Example E+E (Area addition):
||||| 2 LwPLines -> Addition Result: 34484.255
Enter operation 34484.255 [+ - * /] <+>:
Notes:
The command reports which objects couldn't participate (zero length, no numbers in text, etc.) and provides a summary of the calculation.
Command Usage:
At the point in the command where you are asked to give an operation, it is suggested that you select the operation with the mouse from the corresponding palette and not type it for better flow of the command.
Tips:
When drawing texts with numbers inside phrases which you want later to participate in operations, be careful not to write in these phrases other numbers before the one you want to be calculated.
For example, if you select for participation in an operation text with the phrase "E2a= 10.55 sq.m." then from the analysis of the phrase the command will distinguish the number "2". You could write "Ea'= 10.55 sq.m." or something else and then the number "10.55" will be selected.
The command distinguishes the 1st number it finds inside a phrase so after that you can write whatever you want.
Broken Length DDD
You select with points on screen a path of which the total length is calculated. The path is drawn temporarily on screen. In the final calculation each individual distance is also displayed. You also have Undo capability during point selection.
Calculates the total length of a polygonal path by picking points sequentially. Useful for measuring irregular perimeters.
How it works
The command waits for you to pick points on the drawing that define a path. A temporary polyline is drawn as you pick points.
Undo capability: The last point you gave is cancelled and the last distance will not participate in the final calculation of the total length. (Accordingly the temporary drawing of the path changes while the last distance that was cancelled appears with a dashed red line.)
Command Usage:
Useful for measuring the total length of complex, non-linear paths like site boundaries, piping routes, or electrical runs.
Result Annotation on Screen ZP2T
Definition of settings for annotation of the result or the entire operation on screen. You can, if you want, have Operations annotated on screen (Operations with numbers, with block, with objects, with surfaces, broken length).
Configures how calculation results are displayed on the drawing. Can show just the result or the full calculation.
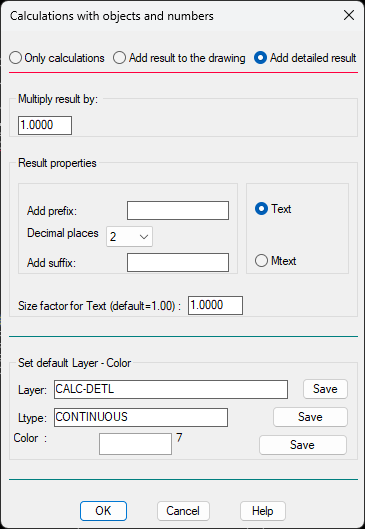
ZP2T settings interface
Options
- Annotation of result or the entire operation
- Multiplication of result with factor
- Text before and after the number
- Text size
- Decimals
- Text or Mtext
After entering the result on screen you can move it to the desired position.
Command Usage:
Configure once how you want calculation results to appear, then all subsequent calculations will use these settings for consistent annotation style.
Slope Calculation KL
Slope calculation between 2 points giving for each a numeric value or selection of some number from the Drawing (Text or Block) or selecting the Z of some point. After the slope is calculated you have data for new points.
Calculates slope between two points with elevation values, then allows extrapolation to other points.
===> A: value Text/Attribute, Z: Z of object, P: Z of point (point).
You are asked to give the 1st point of which the elevation will be recorded (for calculation of the elevation difference with the next point) and the x,y,z coordinates (for calculation of the distance with the next point).
You can select A, Z or P for the selection method.
Elevation calculation (click for details)
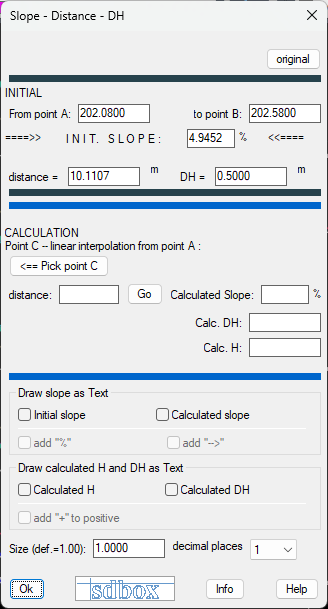
Slope calculation interface - part 1
Slope Calculation Interface
Initially: The initial values as you selected them on screen are set in the corresponding fields. This option exists because you can type other value in the fields "====> SLOPE:" and "... from A" of the 1st section for the calculation of the new point C and later you may want to restore their initial values.
... from A: The elevation of the 1st point is displayed. You can change this value by typing a new value for the calculation of the new point C. If you want to restore the initial value press the "Initially" button.
... to B: The elevation of the 2nd point is displayed.
SLOPE: The slope as calculated from the selections on screen and the distance you gave is displayed. You can change this value by typing a new value either for the calculation of a new point (Point C) or for the annotation of the initial slope on screen. If you want to restore the initial value press the "Initially" button.
Distance: The distance of the 2 points you selected on screen as measured or with the new value you gave before opening the dialog.
ΔH=: The elevation difference of the 2 initial points you selected on screen.
Point [C] calculation at distance from [A]:
<== You are transferred to the drawing screen where you select some point (point C) with the mouse at which its elevation (H) will be calculated based on its distance (and direction) from A and the initial slope as displayed in the dialog.
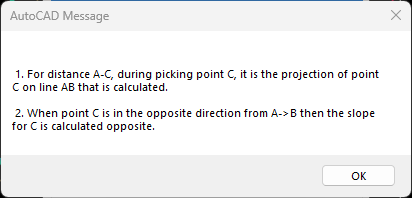
For the distance A-C the distance of the projection of point C on the line AB is calculated.
When the new point C is in opposite direction from A->B then the slope for C is calculated opposite.
As long as you select the new point C the dialog reopens and the distance A-C is displayed in the corresponding field "Distance:".
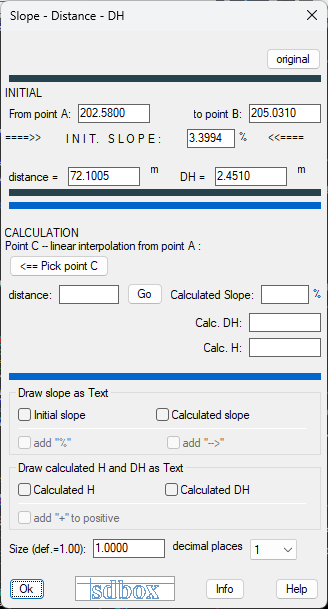
Slope calculation interface - part 2
Calculation Results
On Drawing: Zγ= You are informed if the point you selected on screen had Z. This value does not affect the calculation of the final H.
Go: The values in the corresponding fields for the calculation of the final H of point C (which you selected on screen) are displayed.
Slope: The slope with the value that participates in the calculation of the final H of point C. The slope value is what is defined or what you have written in the field "Slope:" of the 1st section of the dialog.
ΔH: The elevation difference AC. You can correct it or write something else and this will be written on the drawing screen.
Final H: The final H of point C. You can correct it or write something else and this will be written on the drawing screen.
Annotation of slope on Drawing
You have the ability to select whether and what will be annotated on the drawing screen for the initial slope or the data of point C.
Initial Slope: After clicking "OK" the initial slope (that was calculated from the 2 initial points or what you have written in the field "SLOPE:") is written on screen. On screen the slope is written as text (Text) in the direction AB and in the middle of the distance AB.
Calculated Slope: The slope with which the H of point C was calculated is written on screen. (This slope is what was defined or what you have written in the field "slope:"). On screen the slope is written as text (Text) in the direction AC and in the middle of the distance AC.
with "%": To whichever of the 2 above slopes you have selected to be written on screen the symbol "%" is added at the end (e.g., "-72.187 %").
with "-->": To whichever of the 2 above slopes you have selected to be written on screen an arrow in the direction of the 2 points is drawn below the text of the slope.
Annotation of calculated H and ΔH
You have the ability to select to annotate the H and ΔH that have been calculated for point C.
Calculated H: After clicking "OK" the calculated H of point C or whatever else you have written in the corresponding field is written on screen. On screen it is written as text (Text) above point C.
Calculated ΔH: After clicking "OK" the calculated ΔH of point C or whatever else you have written in the corresponding field is written on screen. On screen it is written as text (Text) below point C.
"+" for positive: "+" is added at the beginning of every positive number from the above that you select to be written on screen.
Help: Displays help for the command.
OK: What you have selected is written on screen and you are informed on the Command Line for the results.
Slope calculation example
Command Usage:
Essential for civil engineering and surveying work where you need to calculate slopes between points and extrapolate elevations to other locations.
Area Calculation ZAA, ZAAS
Area calculation of closed area with selection of central point on screen or selection of Pline (ZAA) or selection of the points that define the surface (ZAAS).
Calculates area of closed regions either by picking inside a boundary or by selecting points.
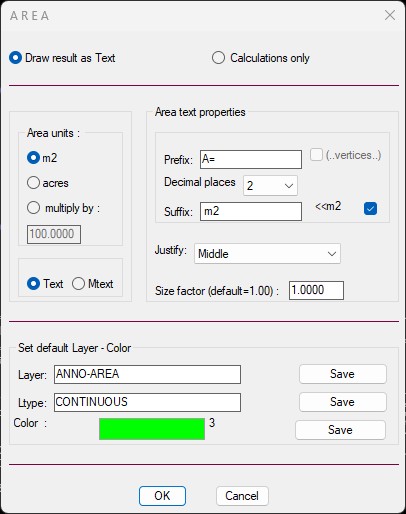
Area calculation example
ZAA vs ZAAS
- ZAA: You select a point on screen, the area of closed region is calculated (with the same logic as when you put Hatch or draw Boundary) and then you have the ability to annotate the area on the drawing screen. You also have the ability to select Pline. If closed shapes are found inside the area there is capability to subtract them from the surface.
- ZAAS: You select one by one the points that define the surface. The shape is drawn temporarily on screen and the elements are calculated as if it were a closed Polyline.
Text Height is set automatically according to the print scale.
Below the procedure of ZAA is presented:
ZAA Procedure
You select a point on screen, within the closed region of which you want to calculate the area or select a closed Polyline. If another closed shape is found inside the area then it is suggested to subtract its surface.
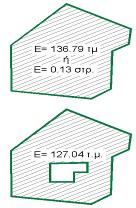
Area example
If no external closed region is found the following message appears:
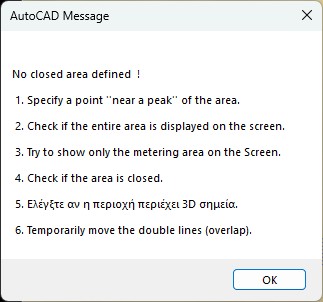
No closed area found message
Possible reasons:
- When you select a point near some vertex (instead of the middle) of the closed region AutoCAD analyzes the objects more easily and determines the closed region.
- If not all of the region appears on screen AutoCAD cannot determine it.
- If the Drawing consists of many objects then for the determination of the closed region it is better for as few objects as possible to appear on screen and for this reason to zoom in the closed region before selecting point.
- The region, within which you select point, is not closed. You can examine the perimeter of the region and correct the segments that need to close the perimeter.
- If the closed region contains 3D points along the perimeter then the area cannot be calculated.
If a closed region is found then the command continues giving the data of the region and the option of annotation of the area on screen.
Command Usage:
If you want to also have the ability to import the vertices and the lengths of the sides of the closed region use the command ZID or ZIDS.
Tips:
The command ZAA, with selection of point in the center, works with the Hatch logic of AutoCAD or drawing Boundary. So where you can put Hatch you can also do area measurement.
It is suggested to use ZIDS instead of the corresponding one of AutoCAD, because you can see the boundaries of the surface on screen and do Undo during point selection.
Numbers-Text from Selection BVC
Annotation of texts on the drawing screen with ability also of selection of value from Block, Text or Xref. You can set fixed prefix or suffix during annotation. For annotation of numbers you can set multiplier and decimals. Text Height of the texts is set automatically according to the print scale.
Creates text annotations by typing, selecting existing text/attributes, or through calculations.
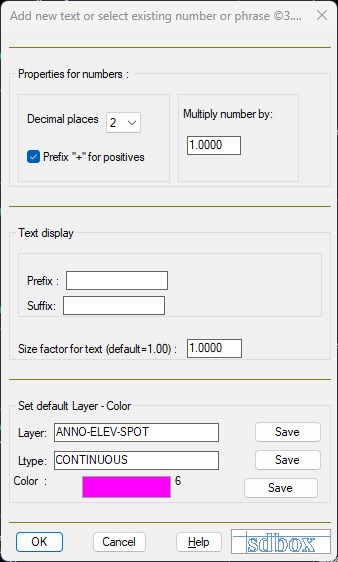
BVC command interface
Initial Setup
The 1st time you run the BVC command in some drawing the above dialog opens where you select restrictions during selection of values from Block in the Drawing.
If in the same drawing you want to be asked for the above type DBVC before running the BVC command.
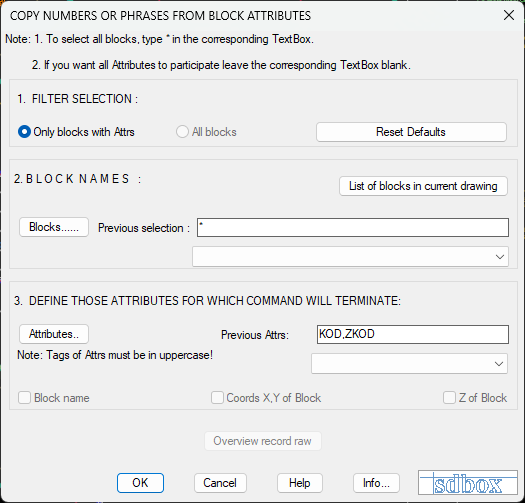
Block selection settings (click for details)
Text/Number Input
Enter 1st Text or Number <ENTER=Pick>:
You can:
- Type some text or number: You write the text and then place it on the drawing screen as text.
- Press Enter or right click and select some text, or Attribute of a Block or object from Xref on screen.
- Type "@" and do calculations and operations for number.
a. If you type some text:
You write the text and then place it on the drawing screen as text.
b. If <ENTER=Pick>:
You select on the drawing screen with the mouse text from Block or Xref or Text and then place it on the drawing screen as text.
c. If [@ = calculations]:
If you type "@" you can do calculations and operations for numbers and then the final number is placed on the drawing screen as text.

Calculations and operations (click for details)
As long as you select text or number with one of the 3 above ways the command continues for the annotation of the selection on screen as simple Text.
At the end of the command you are informed of the number of new phrases or numbers that were added to the Drawing with the command.
Command Usage:
With the BVC command you have the ability to insert phrases or numbers with ability of selection of others from the Drawing (Text, Block or Xref) and all these to be written in the same way (Text Style, Layer and size) on the Drawing as new texts.
You can even do complex calculations for determination of the number that will be annotated as text on the Drawing.
Refresh Selection Data DBVC
The selections for which Blocks or Attributes will participate in the BVC command are refreshed.
Resets the selection filters for the BVC command, forcing it to ask for block/attribute restrictions again.
Command Usage:
Use when you want to change the block/attribute selection criteria for the BVC command in the current drawing.